


Published: .
- Why employees can't find answers
- Creating or opening a project
- Creating topics and building the hierarchy
- Filling topics with content
- Managing structure and statuses
- Reviewing and previewing
- Exporting and saving
- The end result
- What's next and keyboard shortcuts
- Frequently asked questions
Why employees can't find answers
Imagine you're responsible for the documentation of an internal automation system. The system has a life of its own: it gets updated, grows new features, and changes its interface. Meanwhile, employees keep writing to support with the same questions — how do I create a request, where can I see the approval status, why won't the report generate. You open the existing help file to check whether it answers the question, and you gradually realize what's wrong. The topics are in no particular order: the guide to creating a request comes after the topic on notification settings, and there's no separate topic on exporting reports at all. Technically the answers are there, but you can only find them by chance.
In a situation like this, you don't just want to rewrite the text — you want to gather related topics in one place and arrange them in the order an employee moves through the system. Then someone opens the help file, sees familiar topic names, and finds what they need in a minute without coming back to support with the same question.
That's exactly what Dr.Explain is built for: a project in it is a tree of topics with unlimited nesting. You can rearrange that tree, move topics around, mark them with statuses, and assemble a finished help file from them — without rebuilding the document from scratch each time.
Creating or opening a project
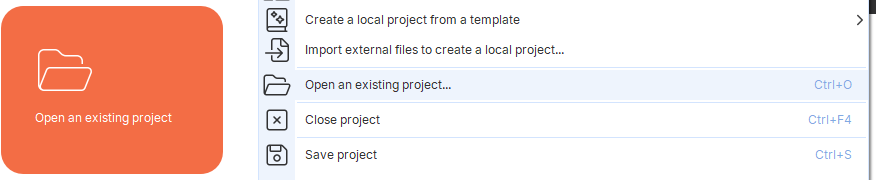
If you already have a draft of your help content in a Word file, or text scattered across multiple DOCX files, import the existing document using the "Open an existing project" button on the start screen, or via "File → Open an existing project" after launching the program:
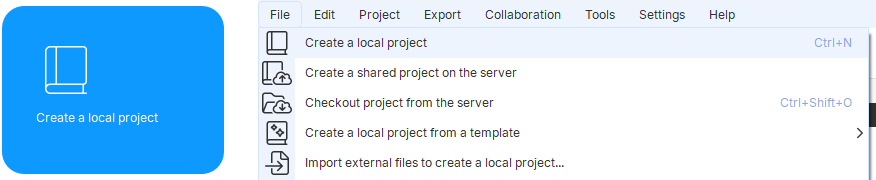
If you don't have any text ready yet, create an empty project using the "Create a local project" button on the start screen, or via "File → New" after launching the program:
Don't waste time on formatting at this stage. Your goal right now is to get an empty tree that you'll add topics to.
Creating topics and building the hierarchy
Right-click the project root and choose "Add topic." Type a title, then add child topics for steps or subtopics.
If you're adding topics one after another, it's more convenient to use Ctrl+T for a child topic and Ctrl+D for a sibling topic — the difference is whether the new topic ends up under the current one or next to it. Here's what the topic tree looks like with one of the built-in templates:
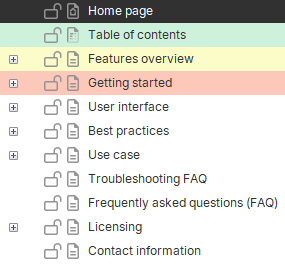
Don't nest more than three levels deep unless you really need to. Someone looking for an answer scans the tree from top to bottom; if they have to expand five levels to reach the right topic, they'll go back to support.
Filling topics with content
Select a topic in the tree and type your text in the right-hand panel. The editor supports standard formatting, inserting images, tables, numbered steps, and callout blocks. Here's part of the toolbar in Dr.Explain:

For an internal automation system, annotated screenshots are especially valuable: the employee sees the button they need to click instead of an abstract description. Dr.Explain lets you capture the screen and add numbered callouts right in the editor, without redrawing screenshots by hand.
If a topic gets too long, split it into child topics. One topic — one task the employee wants to complete.
Managing structure and statuses
If a topic ends up in the wrong place, drag it in the tree — the structure updates immediately and there's no need to rebuild the document. You can move it not only to an adjacent level but into any topic of the tree.
When several people are working on the help file or you're getting it ready for release, turn on statuses. Yellow means the topic is in progress, green means it's ready, red means it's waiting for review or edits, and gray means it hasn't been started. This turns the tree into a heatmap: you can see which topics aren't ready yet without opening each one.
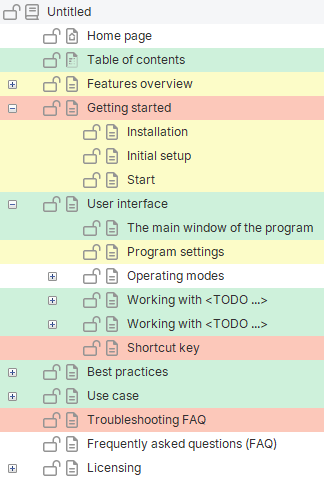
Finished topics can be locked against accidental edits via the context menu — useful when a colleague joins the project.
Reviewing and previewing
Switch to preview mode to see how the topic will look in the final document. Dr.Explain offers HTML, CHM, and PDF preview modes. For an internal system, the HTML version is usually enough: it shows how the help file will open in a browser:
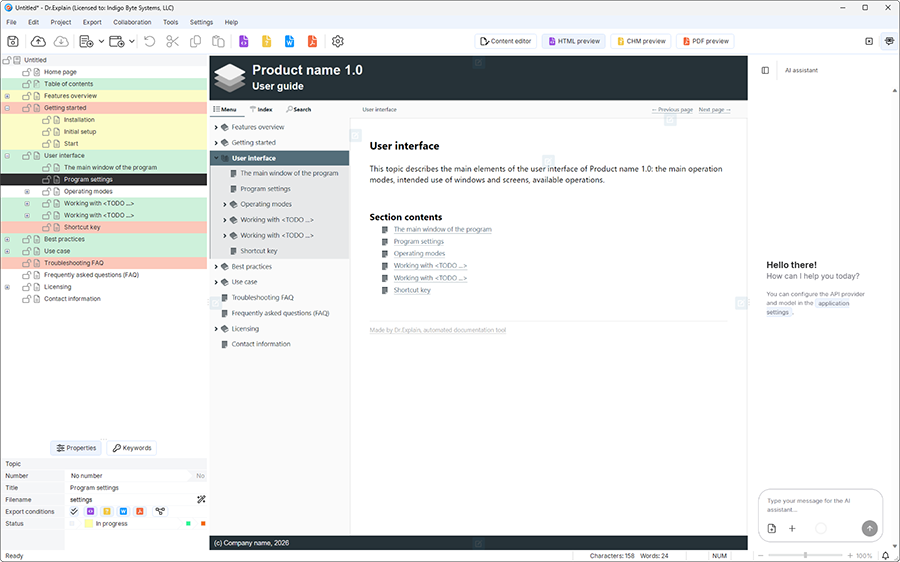
Pay attention to where the topics sit in the preview's table of contents. If the topic employees look for first ends up at the bottom of the list, go back to the tree and move it up.
Exporting and saving
Save the project via "File → Save." To distribute the help file among employees, export it to HTML — you can host it on the internal portal or open it from a shared folder. If the system requires CHM or PDF, choose the appropriate format from the export menu; the same project exports to all three formats without rebuilding.
The end result
You now have a topic tree that mirrors how employees actually work with the system: from creating a request to getting a report. Topics are named the way people search for them, related topics sit next to each other, and statuses show what's ready for publication. An employee opens the help file, sees familiar names, and finds the answer without filing a ticket.
What's next and keyboard shortcuts
Once the structure is in place, it makes sense to set up conditions for displaying topics — for example, hiding technical details from regular employees while keeping them for administrators. If a team is working on the help file, assign sections by status and lock the finished topics.
If you're adding topics one after another, Ctrl+T and Ctrl+D will save you the most time: the difference is whether the new topic ends up under the current one or next to it.
| Shortcut | Action | When it helps |
|---|---|---|
Ctrl+T | Add a child topic | When you need to break a single topic into subtopics |
Ctrl+D | Add a sibling topic | When you're creating a list of similar topics in sequence |
Insert | Add a subtopic | When it's easier to keep working without leaving the text you're editing |
Enter | Add a sibling topic after the current one | When you need to insert a topic right after the one you're working on |
To keep exploring what Dr.Explain can do, we recommend the article "Adding Tables and Text to Industrial Software Help: Create Instructions Users Actually Understand."
Frequently asked questions
Can I change the structure after exporting?
Yes. An export is a snapshot of the project at the moment of export. You can keep changing the topic tree in the source project and export again; the original structure is untouched.
What if I need to hide a section from the final document?
Dr.Explain lets you set conditions for displaying a topic so it doesn't appear in the export. This is useful for technical topics that only administrators need, not all employees.
How do I undo an accidental topic move?
Use Ctrl+Z right after the move. If you've already closed the project, you can drag the topic back to its original place — the structure in Dr.Explain isn't fixed until you export.
Why do employees still not find the answer even though the topic exists?
Check the topic title. If it's called "Incident Processing Module" but the employee is searching for "How to create a request," they won't open the topic. Rename the topic using the wording employees actually use, and make sure the topic is in a prominent place in the tree.