×

CHM export settings

 
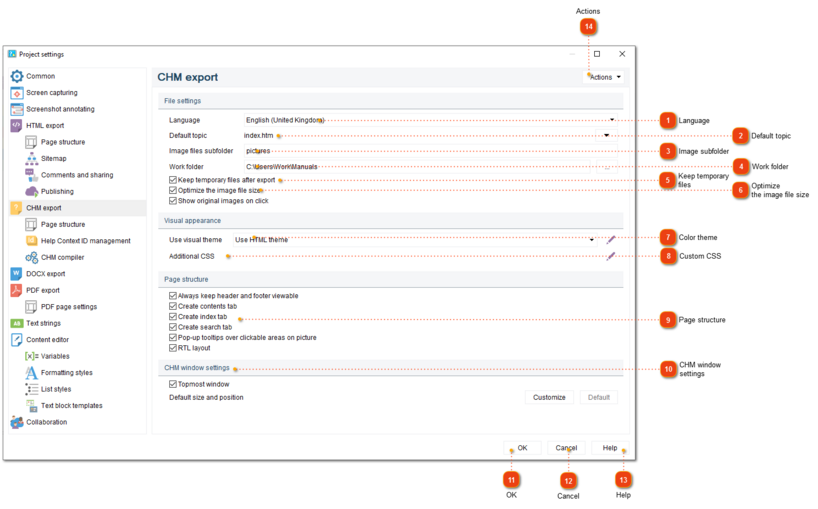
In the CHM export section of Project settings dialog you can configure visual appearance of exported CHM file. CHM export settings are mosly similar to those of HTML export settings.
 
To open the project settings, use one of the ways described below:
  • click button in the application toolbar;
  • go to the Options menu and click the Project settings menu option;
  • use Ctrl+Alt+P shortcut.
     
Project settings dialog should appear. On the left side of it go to CHM export.
 
CHM export settings
 
1

Language

1. Language
 
To ensure search functionality in the exported CHM file works properly, select the correct language from this drop-down list.
2

Default topic

2. Default topic
 
Here you can set the default topic that will be displayed when the user opens the CHM file. Click the arrow down button to select the topic from the project's topic tree.
3

Image subfolder

3. Image subfolder
 
Use this field to specify the subfolder for image files.
During CHM export a temporary folder will be created. HTML and image files will be placed into this folder. If you want the image files to be stored in an pictures subfolder, type "pictures" here. Otherwise, leave this field blank.
4

Work folder

4. Work folder
 
Use this field to specify the folder that Dr.Explain must use as a location for temporary HTML and image files.
5

Keep temporary files

5. Keep temporary files
 
Check this option to keep temporary files in work folder after CHM compilation. Usually it's needed if you're planning to modify these files yourself after export and compile CHM file from modified files.
6

Optimize the image file size

6. Optimize the image file size
 
Check this option to enable better compression of output images with possible almost invisible quality reduction.
7

Show original images on click

7. Show original images on click
 
Enable the option to display the original images on a click in the so-called "lightbox".
 
Image in the lightbox:
 
8

Color theme

8. Color theme
 
Select a color theme to use for the pages of the exported CHM file. You can create your own color themes using buttons next to the theme list.
9

Custom CSS

 
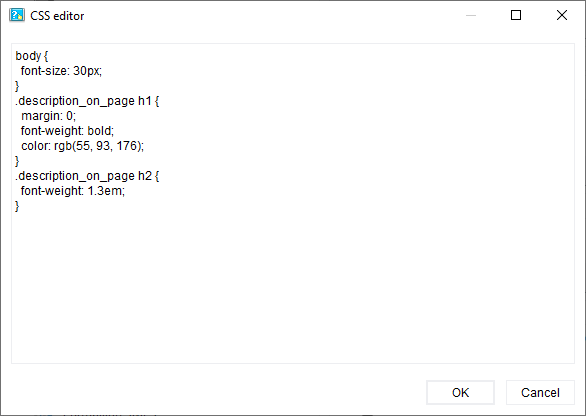
Press this button to specify your own CSS code to override CSS generated by Dr.Explain. This way can customize the appearance of CHM pages: fonts, colors, sizes, etc.
 
10

Page structure

10. Page structure
 
Use this section to configure the structure of the page: show or hide the menu, index and search tabs.
 
If you select checkbox Always keep header and footer viewable, the height of the generated pages will be automatically adjusted to fit to the height of the CHM viewer window. The header, footer and sidebars will be docked to the window's sides while the central content part will remain scrollable.
 
Select checkbox Pop-up tooltips over clickable areas to enable pop-up tooltips that will be displayed when the mouse pointer moves over the callout on the annotated screenshot. The tooltips will display the control description of the associated control, so that the user doesn't have to scroll the page down to read it.
11

CHM window settings

11. CHM window settings
 
Use this section to configure settings for CHM windows:
  • select the Topmost window checkbox to make the CHM file display on top of all windows;
  • click Customize to edit the default size and position of the generated CHM file. The following dialog window will appear:
     
12

OK

12. OK
 
Press the button to accept all changes and close the dialog.
13

Cancel

13. Cancel
 
Press the button to close the dialog and to discard the changes.
14

Help

14. Help
 
Press the button to show the context help page.
15

Actions

15. Actions
 
Press this button to import settings from another project file or from HTML export settings.
Made by Dr.Explain, software documentation tool