go to the Project menu and click the Project settings menu option;
use Ctrl+Alt+P shortcut.
Project settings dialog should appear. On the left side of it go to Screen capturing.
Draw no bounds
Select this checkbox if you don't want the colored rectangle around the currently selected area or window to be shown when you point your cursor at it (the colored rectangle will not be present on the captured screenshots regardless of the state of this checkbox).
If this checkbox is selected, then you can press and hold the right Ctrl to lock the cursor in certain position (e.g. over a button to activate its pop-up tooltip). Then, you can continue selecting windows/controls to be captured with another "virtual" cursor. Virtual pointer is useful when you want to capture a part of screen that disappears when you move your mouse pointer away, e.g. a pop-up tooltip.
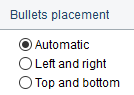
Select appropriate option button to specify how to distribute the numbered callouts around the captured windows. You can rearrange them manually later in the Designer mode.