Introduction
This article is devoted to creation of help file in CHM format and its further integration into the Visual Basic application. Fr om the article you will know:
- How to create and adjust a Dr.Explain project;
- How to work with a help file structure;
- How to create an annotated image of Visual Basic application interface;
- How to set a Help ID;
- How to save a project;
- How to export a project to CHM format;
- How to integrate a help file into the Visual Basic application.
Installing Dr.Explain
To download Dr.Explain installation program, click «Free download» button on the product web-site http://www.drexplain.com/. After finishing, run a downloaded program. To complete an installation process, follow the setup wizard instructions (Picture 1).
You can use a trial version; it has the same functional as a full version, however, all images in exported file will have watermarks.
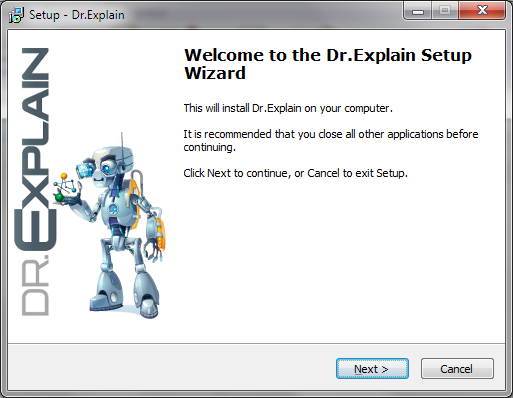
Picture 1. Dr.Explain setup wizard
Creating and saving a new project
To create a new help file project sel ect «Create a new project» radio button in the «Dr.Explain projects» window (Picture 2) and then press «OK». Also you can use «Create» item in the «File» menu.
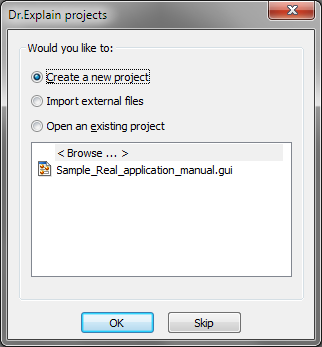
Picture 2. «Dr.Explain projects» window
To change CHM format export parameters use «Options -> Project settings -> Export to CHM».
Creating help file topics
To make a help file structure handy and exhaustive, you have to create topics for different Visual Basic application elements.
New topic can be created either by clicking «Options -> Add topic» in the main menu, or by using «Add -> Add topic» pop-up menu item, which can be activated by right-click on any project tree item (Picture 3).
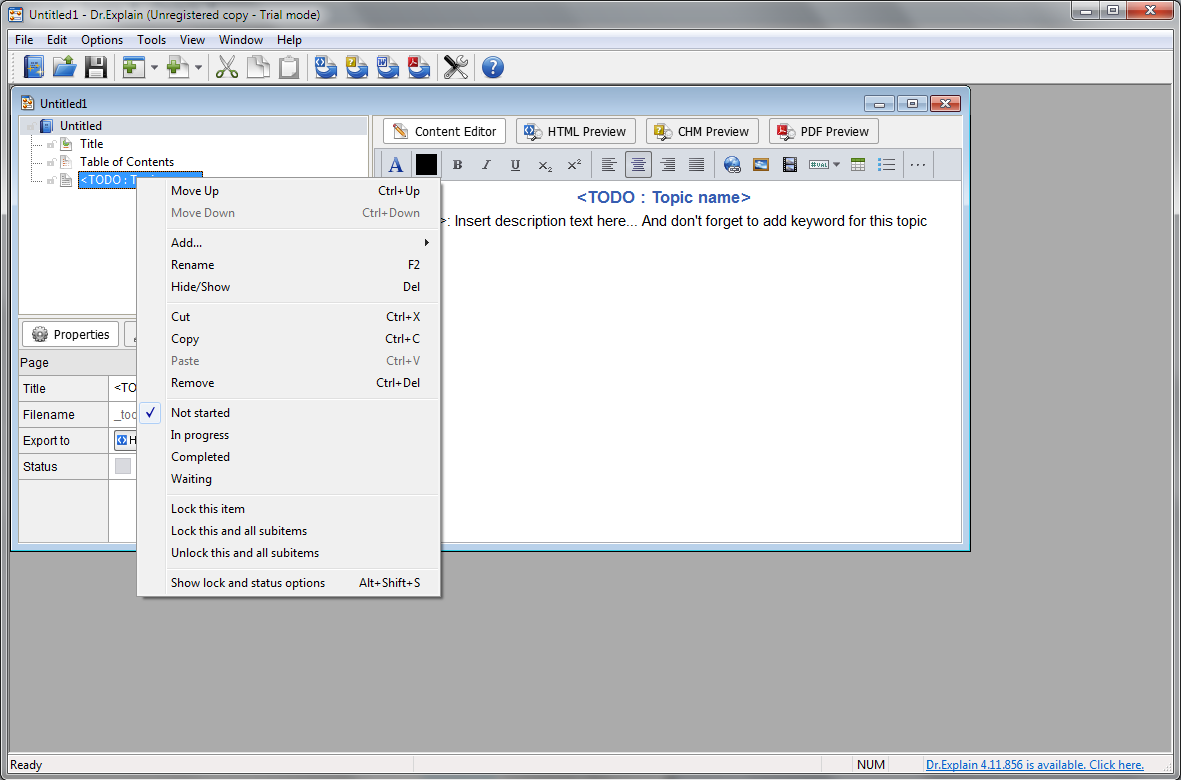
Picture 3. «Dr.Explain» project tree
To change order of topics and their names use «Rename», «Move Up» and «Move Down» pop-up menu items.
To fill out the particular topic, sel ect it in the project tree and then enter its content in the editor window. There is a standard text editing toolkit as well as some tools for working with images, videos, tables, and variables (variables usage allows you to replace recurrent data with variable; in this case if you change variable value, corresponding text will be changed in the whole document).
For increasing a convenience of help file searching, you have to create a list of keywords. You can add and delete keywords using buttons located on the panel which can be shown up by pressing the «Keywords» button (Picture 4). To set properties of keywords to topic link, sel ect a corresponding topic in the tree project, and enter labels for the keywords you want to associate the topic with.
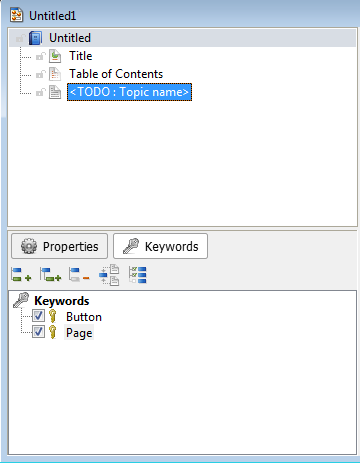
Picture 4. Keywords
To make an illustrative description of Visual Basic application interface forms as well as their separate components, use «Capture an object» function (Picture 5) – «Snapshot» button.
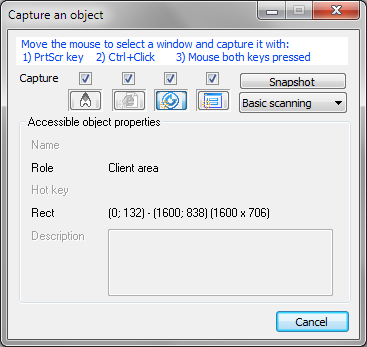
Picture 5. «Capture an object» window
In capture window check «Accessible-object» or «Win32-window» boxes, then go to the Visual Basic application and sel ect describable object by one of mentioned in the window ways.
After that a new topic containing annotated interface image will be created in the editor window (Picture 6). Using editor you can add and delete single elements annotations and change order of various items.
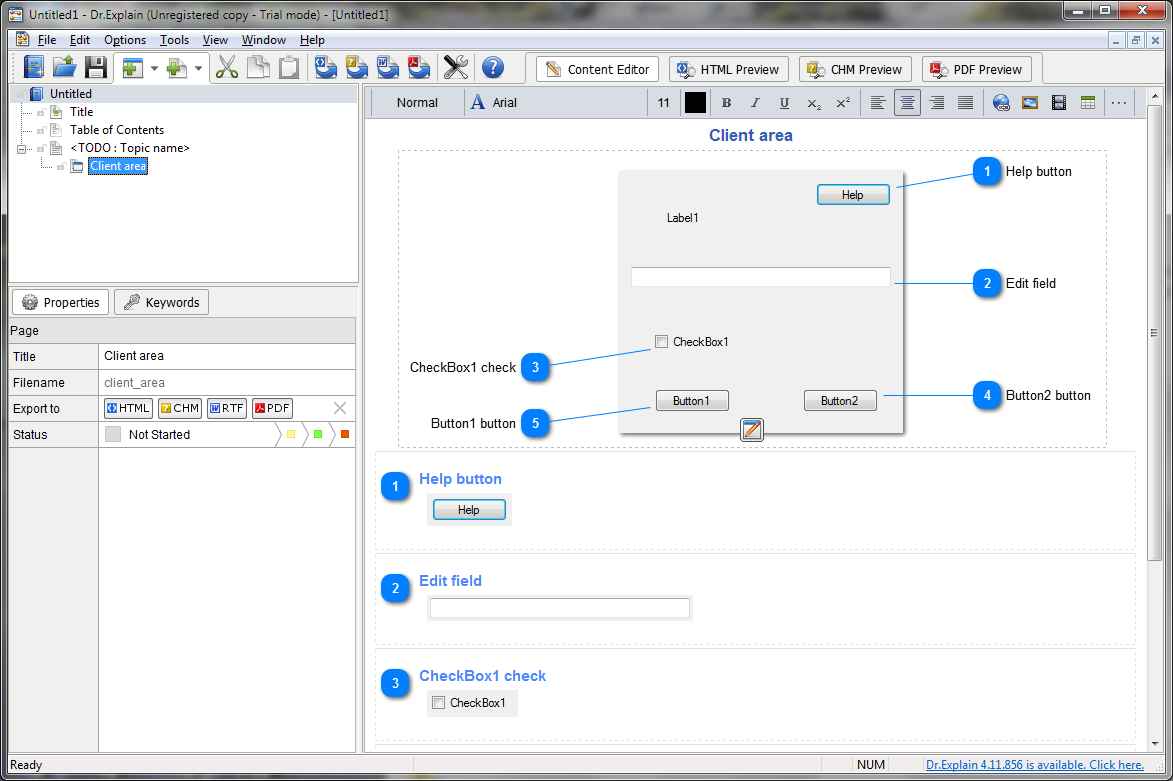
Picture 6. Result of object capturing
Changing topic Help ID
To be able to link help file topics to Visual Basic application elements in future, you have to set a Help ID for each desired topic. For this select a desired topic and click on «Help ID» field in the page properties panel (Picture 7). Make changes if necessary; to save them just remove a focus fr om the field.
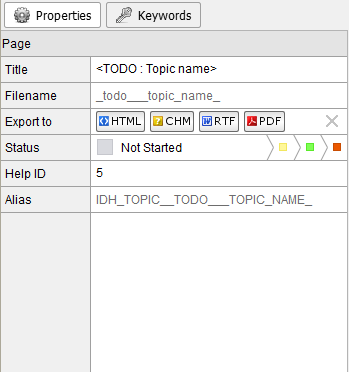
Picture 7. Changing Help ID in the page properties panel
To check topic Help IDs uniqueness use «Tools –> Project validation» menu item. If some repeating Help IDs are found, you will see a message mentioning these IDs. Get rid of all doubles to make help file topics work properly.
Previewing and saving a new project
Before you start document export, use the preview function. For this click «CHM preview» button on the top of the current project window. In the preview mode make sure all pages and topics are shown properly. Go back to editing mode and make desired changes if necessary.
If you want to resume your work with the project later it is recommended to save the project. For this use the «File -> Save as» main menu item. After you choose it, the standard save file window where you can enter a file name or point its location, will come up.
Exporting project to CHM file
After you fill all topics out you should export your project. For this click «Options -> Export to CHM» in the main menu. If you would like to validate the project before exporting process check «Run the validation tool before exporting». If you want generated file to be open immediately after the exporting process, tick «Open CHM file» check box. To overwrite an existing file with no user confirmation tick «Overwrite silently» check box. After you set all desired parameters click «Start export» button. You will see «Export to CHM file» window (Picture 8) wh ere exporting process report will be shown.
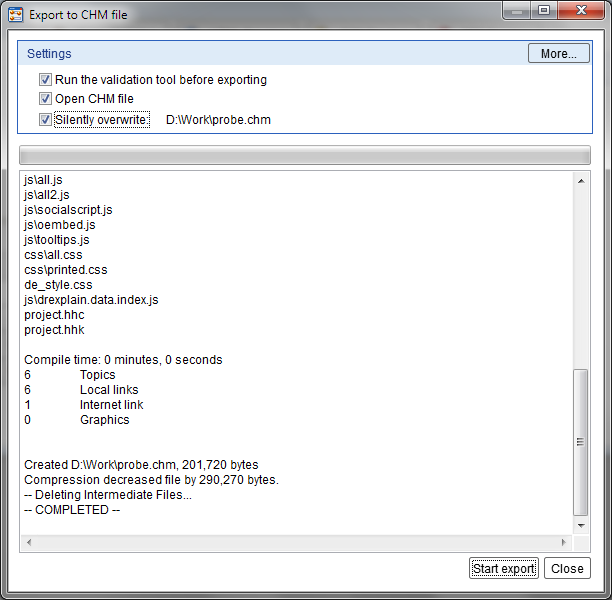
Picture 8. «Export to CHM file» window
Integrating CHM file into Visual Basic application
To call help in Visual Basic application, you have to create a corresponding control element, for example a button.
For this perform the following steps:
- Open your project using your current development environment;
- Go to the form editor (Picture 9);
- Select «Button» in the toolbox;
- Place the element on the form;
- In element properties set button name and text. For example, «HlpButton» and «Help»;
- Go to the element code editor (Picture 10).
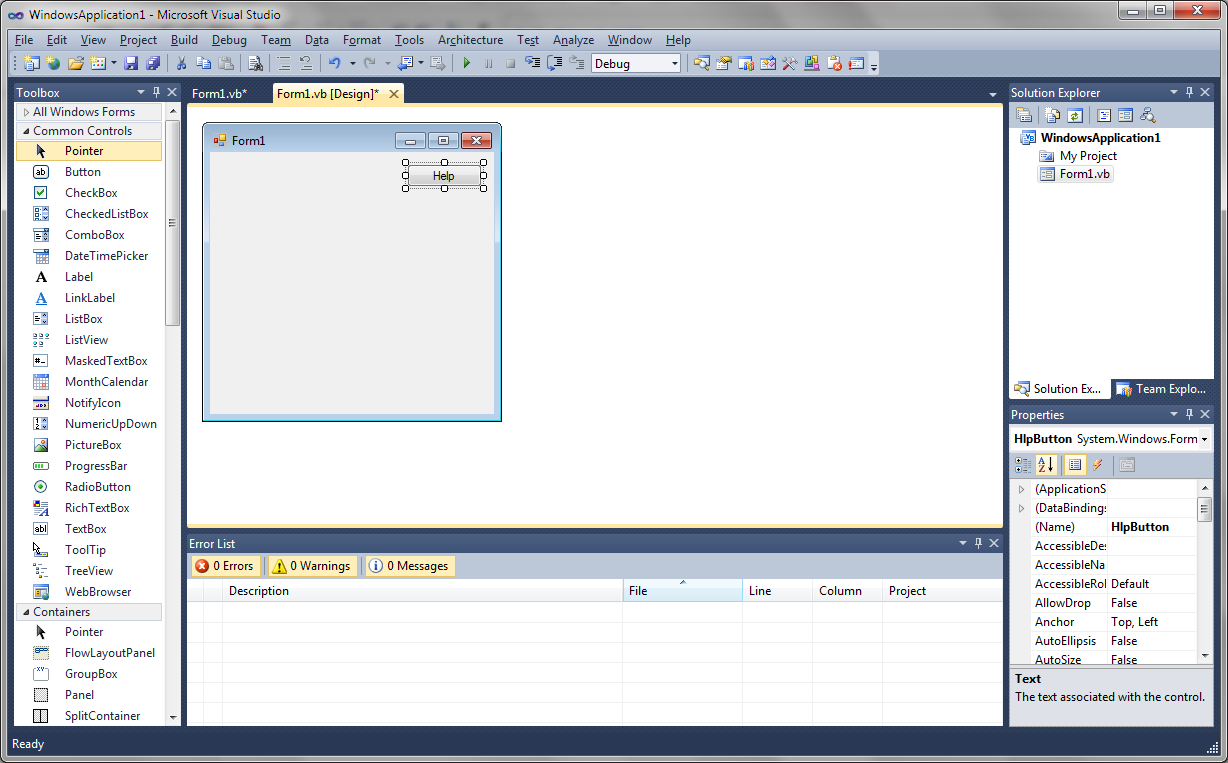
Picture 9. Microsoft Visual Studio form editor
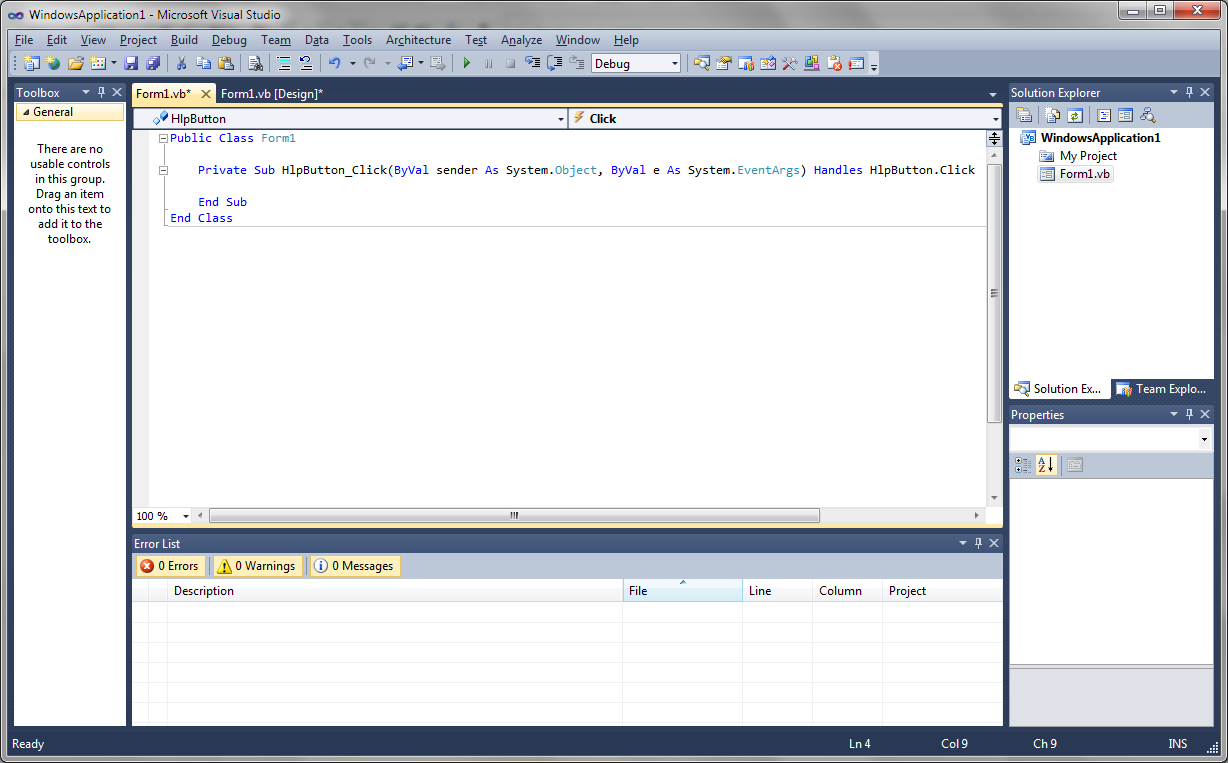
Picture 10. Microsoft Visual Studio code editor
• You can see the name of the help file call element in the following string «Private Sub HlpButton_Click(ByVal sender As System.Object, ByVal e As System.EventArgs) Handles HlpButton.Click» (in our case this is «HlpButton»). Enter the string – «Call Shell("explorer.exe" & My.Application.Info.DirectoryPath + "\help.chm", vbNormalFocus)», wh ere help.chm is the help file name. The control element code should look like this:
Private Sub HlpButton_Click(ByVal sender As System.Object, ByVal e As System.EventArgs) Handles HlpButton.Click
	Call Shell("explorer.exe" & My.Application.Info.DirectoryPath + "\help.chm", vbNormalFocus)
End Sub
- Make sure your help file call button works properly. To run debugging click on «Debug -> Start debugging» menu item. Press «Help» button; your help file in CHM format must be open in separate window;
- Repeat these procedures for each form you want to ins ert a help file call element into.
PLEASE NOTE:To make a help file call button work properly, you have to put the CHM file and the Visual Basic application file in the same folder. If it is necessary to put the help file separately fr om the application file; you have to use the following string: «Shell("cmd /cstart D:\work\techwrite\help.chm")», where D:\work\techwrite\help.chmis the full path to the help file in CHM format.The element code should look like this:
Private Sub HlpButton_Click(ByVal sender As System.Object, ByVal e As System.EventArgs) Handles HlpButton.Click
	Shell("cmd /cstart D:\work\techwrite\help.chm")
End Sub
In this case, every time you change the help file location you have to change the path in the control element code to the actual one.
Be careful in entering control element codes; strictly follow the syntax shown in the examples. This is necessary condition for proper work of control elements.
Linking help file topics to Visual Basic application objects
You can adjust control element properties of Visual Basic application in such a way, that when you focus on particular object and press «F1» button a corresponding help file topic will come up. To implement this you have to do the following steps:
- Add «HelpProvider» component by moving it fr om a toolbar to an application form. A component icon will appear in the bottom part of the form editor window;
PLEASE NOTE: Multiple «HelpProvider» components usage is allowed. This can be useful if information about different elements is located in different help files. Also you can use separate components for separate forms.
- In «HelpProvider» properties window in «HelpNamespace» field enter a help file location;
PLEASE NOTE:In case help file is located in the same folder with executable application file, it is enough to enter filename only. If files are located in separate folders, you have to enter a full path. Every time you change a help file location you have to change «HelpNamespace» field to the actual one.
- Enter the Help ID of the corresponding help file topic in the «HelpKeyword on Help Provider1» field. Select «TopicId» for «HelpNavigator on Help Provider1» field.
PLEASE NOTE:The number of parameters «HelpKeyword…» and «HelpProvider…»> in object properties corresponds to the number of used «HelpProvider» components,and digit in a parameter name corresponds to the number of the component. Be careful in filling these fields.
- Make sure «HelpProvider» component works properly. Run debugging; for this click «Debug -> Start debugging» menu item; after that the initial form of the application will come up. When you press «F1» button a help file topic should be open corresponding to the element in focus;
- Repeat these procedures for each object you want to link with definite help file topic.
Opening particular help file topics using Help Provider component
Besides calling of particular help file topics by corresponding HelpIDs, «HelpProvider» component also can be used for addressing topics by other parameters. To setup a particular topics call, you have to set corresponding values of «HelpKeyword on Help Provider1» and «HelpNavigator on Help Provider1» fields in element properties. To setup a particular help files call by pressing «F1» button, perform the following steps:
- Add a «HelpProvider» component by dragging it fr om the elements panel to the form. The component will appear in the bottom part of the form editor window;
- Enter a help file location in the«HelpNamespace» field in the «HelpProvider» object properties window;
- In the «HelpNavigator on Help Provider1» field choose a desired parameter:
- AssociateIndex – opens «Pointer» tab and highlights a first keyword found in the list, which starts fr om «HelpKeyword on Help Provider1» string;
- Index – opens «Pointer» tab and highlights a keyword in the list mentioned in «HelpKeyword on Help Provider1» field;
- Find –opens «Find» tab;
- TableOfContents – opens a table of contents;
- Topic – opens a topic with a name mentioned in «HelpKeyword on Help Provider1» field.
PLEASE NOTE: Topic name must be in «Topic.htm» format, this is necessary condition for proper work of help file call; - TopicId – opens a topic corresponding to HelpID parameter mentioned in «HelpKeyword on Help Provider1» field;
- KeywordIndex – opens «Pointer» tab and shows the list of topics containing a keyword mentioned in «HelpKeyword on Help Provider1» field.
This way of help call allows you to set addressing and searching in a help system flexibly. Also it allows using of help file or its separate topics for each separate form or element.
If you want to call a particular help system topic by pressing a button, you have to use the following code fragments:
Open startup help page
Public Class Form1
	Inherits System.Windows.Forms.Form
	Private helpfile As String = "help.chm"

	Private Sub HlpButton_Click(sender As System.Object, e As System.EventArgs) Handles HlpButton.Click
		Help.ShowHelp(Me, helpfile)
	End Sub
where help.chm is the help file name (help file and application executable file must be located in the same folder)
Open «Pointer» tab
Public Class Form1
	Inherits System.Windows.Forms.Form
	Private helpfile As String = "help.chm"

	Private Sub HlpButton_Click(sender As System.Object, e As System.EventArgs) Handles HlpButton.Click
		Help.ShowHelpIndex(Me, helpfile)
	End Sub
Open «Contents» tab
Public Class Form1
	Inherits System.Windows.Forms.Form
	Private helpfile As String = "help.chm"

	Private Sub HlpButton_Click(sender As System.Object, e As System.EventArgs) Handles HlpButton.Click
		Dim navigator As HelpNavigator = HelpNavigator.TableOfContents
		Help.ShowHelp(Me, helpfile)
	End Sub
Open «Find» tab
Public Class Form1
	Inherits System.Windows.Forms.Form
	Private helpfile As String = "help.chm"
	Private findtext As String = ""

	Private Sub HlpButton_Click(sender As System.Object, e As System.EventArgs) Handles HlpButton.Click
		Dim navigator As HelpNavigator = HelpNavigator.Find
		Help.ShowHelp(Me, helpfile, navigator, findtext)
	End Sub
Search by first letters of keyword
Public Class Form1
	Inherits System.Windows.Forms.Form
	Private helpfile As String = "help.chm"
	Private AsIndex As String = "me"

	Private Sub HlpButton_Click(sender As System.Object, e As System.EventArgs) Handles HlpButton.Click
		Dim navigator As HelpNavigator = HelpNavigator.AssociateIndex
		Help.ShowHelp(Me, helpfile, navigator, AsIndex)
	End Sub
where me is the search string
Search by keyword
Public Class Form1
	Inherits System.Windows.Forms.Form
	Private helpfile As String = "help.chm"
    Private Index As String = "FAQ"

    Private Sub HlpButton_Click(sender As System.Object, e As System.EventArgs) Handles HlpButton.Click
        Dim navigator As HelpNavigator = HelpNavigator.Index
        Help.ShowHelp(Me, helpfile, navigator, Index)
    End Sub
where FAQ is the keyword
Open by file name
Public Class Form1
	Inherits System.Windows.Forms.Form
    Private helpfile As String = "help.chm"
    Private Topic As String = "Overview.htm"

    Private Sub HlpButton_Click(sender As System.Object, e As System.EventArgs) Handles HlpButton.Click
        Dim navigator As HelpNavigator = HelpNavigator.Topic
        Help.ShowHelp(Me, helpfile, navigator, Topic)
    End Sub
where Overview.htm is the topic name (topic name must be always in Topic.htm format)
Open by HelpID:
Public Class Form1
	Inherits System.Windows.Forms.Form
    Private helpfile As String = "help.chm"
    Private TopicId As String = "1500"

    Private Sub HlpButton_Click(sender As System.Object, e As System.EventArgs) Handles HlpButton.Click
        Dim navigator As HelpNavigator = HelpNavigator.TopicId
        Help.ShowHelp(Me, helpfile, navigator, TopicId)
    End Sub
where 1500 is the HelpID val ue of the desired topic
Open topic list containing a keyword
Public Class Form1
    Inherits System.Windows.Forms.Form
    Private helpfile As String = "help.chm"
    Private KeywInd As String = "menu"

    Private Sub HlpButton_Click(sender As System.Object, e As System.EventArgs) Handles HlpButton.Click
        Dim navigator As HelpNavigator = HelpNavigator.KeywordIndex
        Help.ShowHelp(Me, helpfile, navigator, KeywInd)
    End Sub
where menu is the keyword for topic search.

