×

Comments and social networks

 
In the HTML export -> Comments and sharing section of Project settings dialog you can configure comments (e.g. to collect feedback) and social networks sharing buttons that can be added to your exported HTML files.
 
To open the project settings, use one of the ways described below:
  • click button in the application toolbar;
  • go to the Options menu and click the Project settings menu option;
  • use Ctrl+Alt+P shortcut;
 
Project settings dialog should appear. On the left side of it go to HTML export -> Comments and sharing.
 
Comments and social networks
 
1

Enable Facebook comments

1. Enable Facebook comments
 
Check this option to enable Facebook comments in your online help.
2

Facebook comments box width

2. Facebook comments box width
 
Use this field to specify width of the box with Facebook comments.
3

Number of initial Facebook comments

3. Number of initial Facebook comments
 
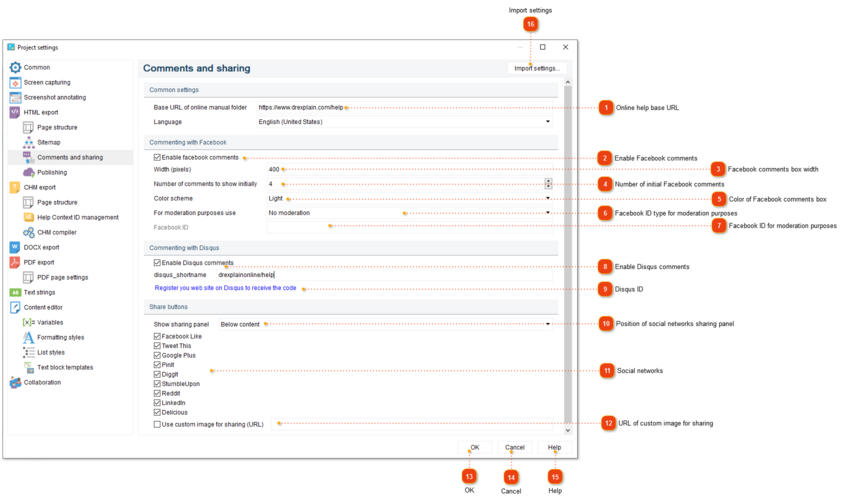
Use this field to specify the number of Facebook comments to show initially when page is loaded. Users can load more comments by clicking the corresponding button or icon at the bottom of the comments section.
4

Color of Facebook comments box

 
Use this field to specify color scheme of the box with Facebook comments.
5

Facebook ID type for moderation purposes

 
If you want to moderate comments and receive notification about new comments in your Facebook account then you must provide either your Facebook User ID or Facebook Application ID.
6

Facebook ID for moderation purposes

6. Facebook ID for moderation purposes
 
Use this field to specify your Facebook ID here. The value depends on ID type you've set in the previous field.
7

Enable Disqus comments

7. Enable Disqus comments
 
Check this option to enable Disqus comments in your online help.
8

Disqus ID

8. Disqus ID
 
Use this field to specify your website Disqus code here. If you haven't one then you can get it for free at https://disqus.com/for-websites/
9

Position of social networks sharing panel

9. Position of social networks sharing panel
 
Use this field to specify if the panel with social networks sharing buttons must be shown bellow or above the main content.
10

Social networks

10. Social networks
 
Choose the social networks you'd like to include in your manual. The sharing panel in your online help will display buttons for selected networks.
11

URL of custom image for sharing

11. URL of custom image for sharing
 
Use this field to specify URL of a custom image to display on social networks when someone shares a link to a page of your documentation. If the URL is empty then an image will be chosen automatically. Usually it's the main image on the shared page.
12

OK

12. OK
 
Press the button to accept all changes and close the dialog.
13

Cancel

13. Cancel
 
Press the button to close the dialog and to discard the changes.
14

Help

14. Help
 
Press the button to show the context help page.
15

Import settings

15. Import settings
 
Press this button to import settings from another project.
16

Language

16. Language
 
Use this field to specify language.
Made by Dr.Explain, software documentation tool