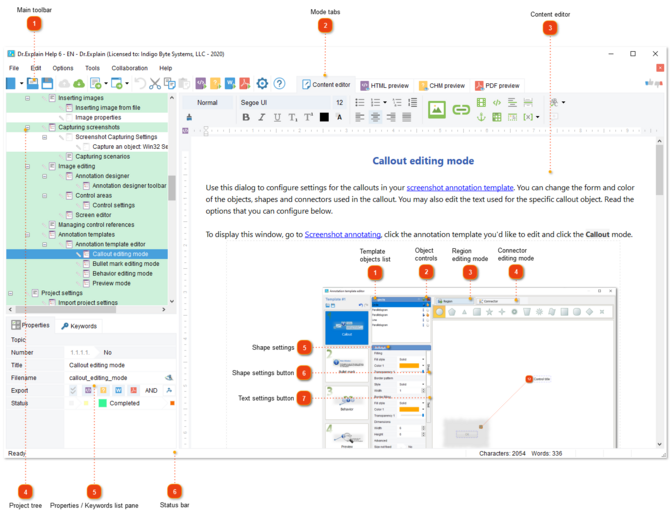
Click this button to insert a new topic page or import external files into the project.
Click this button to create a new topic with an annotated screenshot. Dr.Explain will enter screen capturing mode where you can move mouse pointer over a window of your application or website and make a screenshot. See Capturing screenshots for more details.
If you click an arrow down icon next to this button, you will be able to add an annotated screenshot from an image file or from clipboard.
Click this button to undo the latest action.
Cut the selected topic tree element or text and copy it to the clipboard.
Copy the selected item of the topic tree or text to the clipboard.
Paste an element from the clipboard into the topic tree or text into the content editor.
Click this button to export the current project into HTML online help format.
Click this button to export the current project into CHM file format.
Click this button to export the current project into DOCX file (Microsoft Word).
Click this button to export the current project into PDF file.
Click this button to configure current project's settings. See chapter Project settings for more details.
Status bar shows the status and progress of current operations, the number of characters and words in the topic.
It also shows status and progress of the operations being performed. The status bar also displays hints for toolbar buttons and menu items when you point your cursor at them.
Example of displaying a progress indicator:
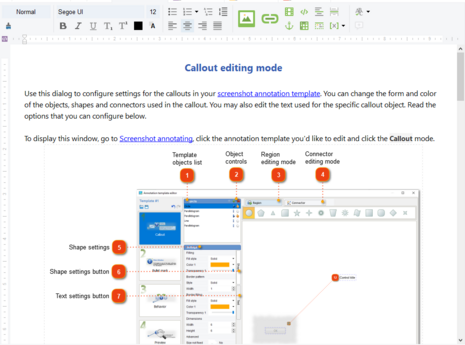
You can change the display size of the content in the editor window. This does not affect the actual size of text, images, or any other elements in the final document. To adjust the size of the content shown in the editor window, use the following methods:
drag the slider — smoothly increases or decreases the content view;
scroll the mouse wheel while holding down the Ctrl (or click the +/- icons) — increases or decreases the view in 10% steps;
click the percentage button (or press Ctrl+0) — resets the view to the original zoom level (1:1).
1WYSIWYG ("What You See Is What You Get") — denoting the representation of text on-screen in a form exactly corresponding to its appearance on a printout.