


Introduction
Dr.Explain is designed to create structured documents containing text, graphics and video information. Dr.Explain allows you to easily and quickly create help files, user manuals, and other documents. With function of capture and analysis of application window, you can easily create a comprehensive description of any interface, including applications based on Microsoft Access. And using the export feature to the output document in the formats: HTML, CHM, RTF, or PDF will make it possible not only to include created manual into documentation or prepare it for use in Web, but also to integrate as a form of help system directly into your application.
This instruction describes the process of creation of Help file for Microsoft Access in Dr.Explain and its subsequent integration into the forms of data base.
New Project Creation
When start Dr.Explain automatically opens "Dr.Explain projects window" (Picture 1).
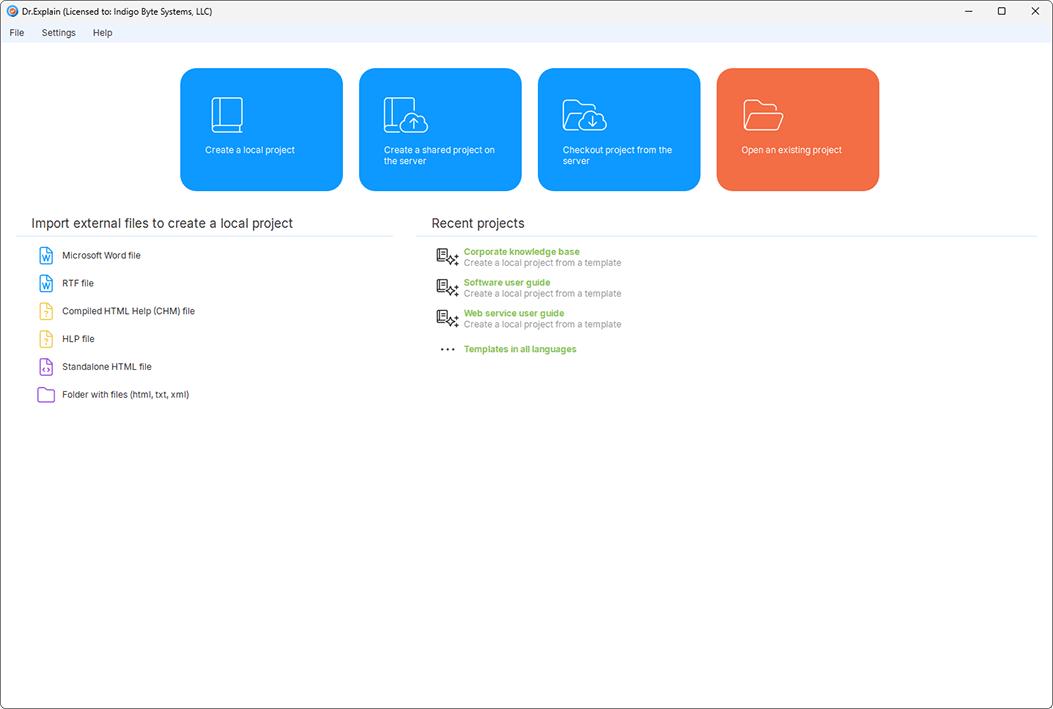
Picture 1 — Dr.Explain projects window
Point "Open an existing project" is intended for renewal the work with previously saved project, in this case the window shows the list of recently created projects and section "Open an existing project...", which opens explorer window for searching a saved project on the disk.
Section "Import external files" allows loading basic content of document fr om files CHM, HTML, XML, HLP, TXT, RTF, and Microsoft Word documents.
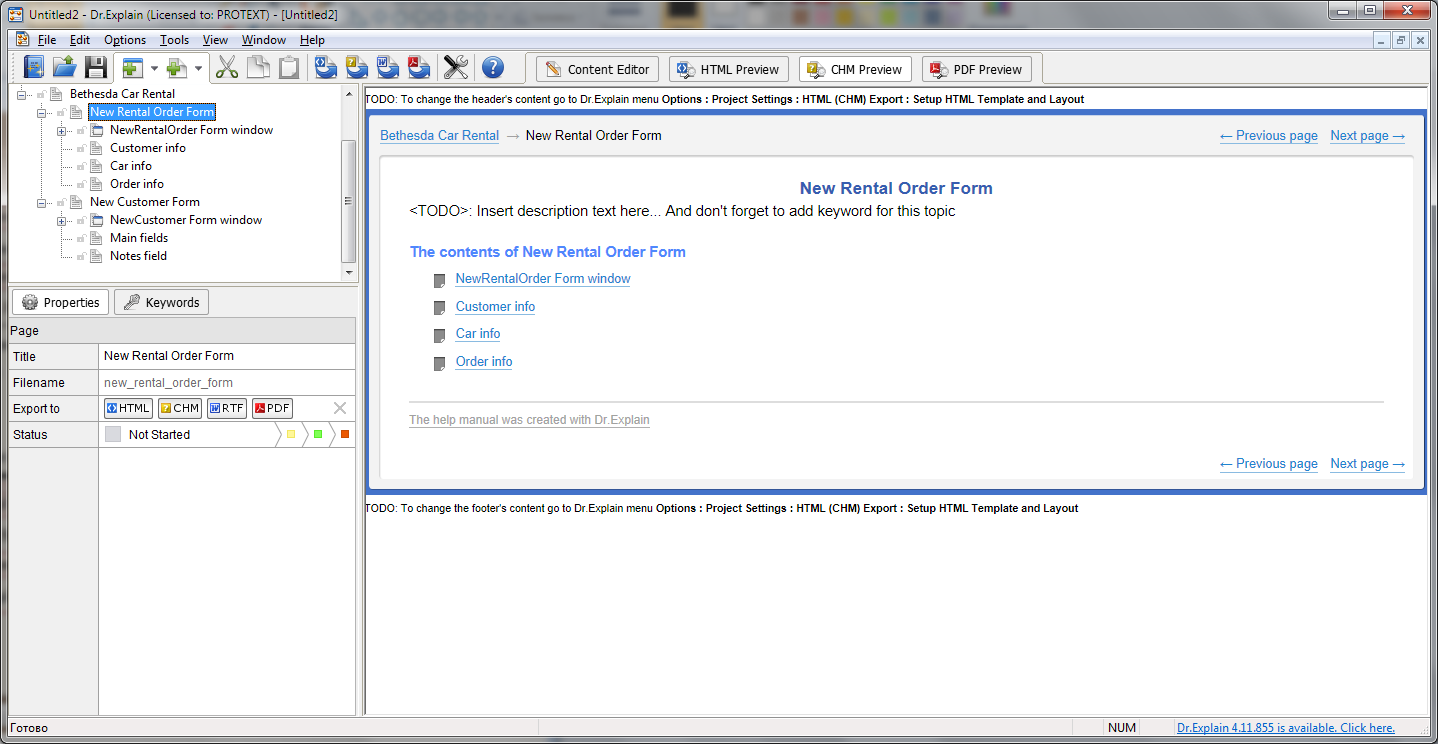
To create a new project select "Create a local project" and click ОК. After that, current project window (Picture 2) opens. On the left upper side of the window the list of all pages, sections and subsections of document is placed. Below control field of properties of the current page is placed, and by clicking "Keywords" button this field shows the list of keywords of the current page with controls. On the right main area of the current project window is placed, which is intended for filling and editing the selected page or section, in the upper part the basic controls are placed.
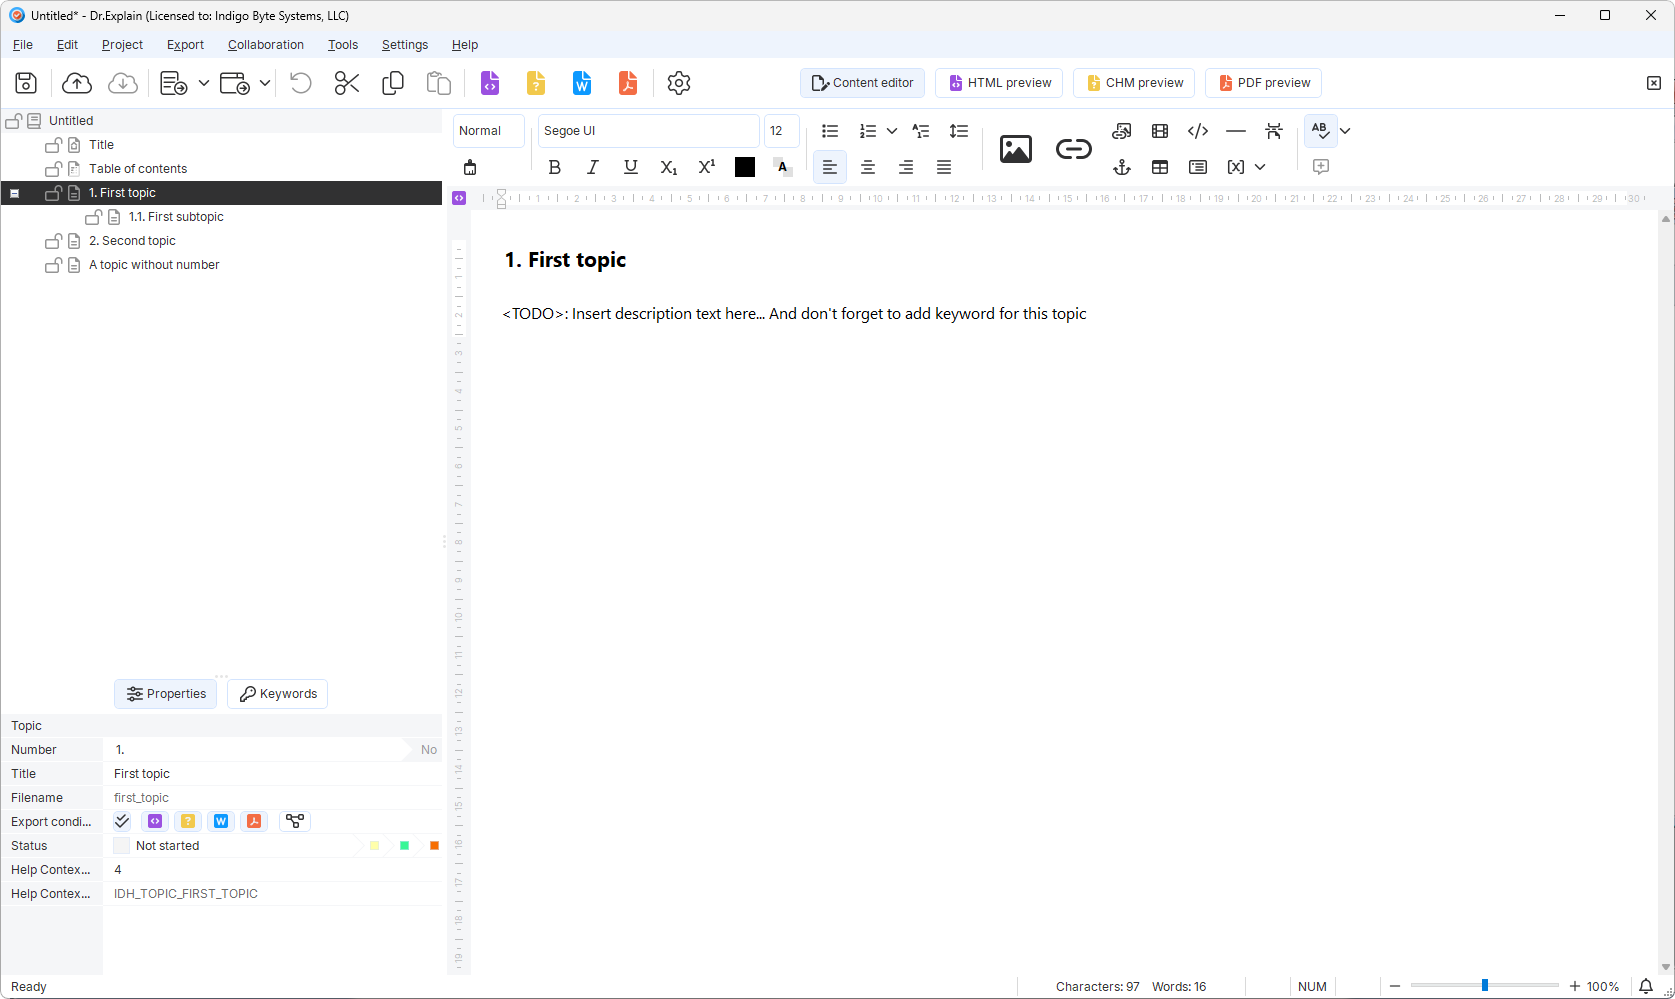
Picture 2 — Current project window
Creation and Editing of Main Document Sections
To select page needed to fill or edit, select the appropriate entry in the list of sections, then take up work with the content in the basic field of editing.
Creation and Editing of Text Sections
For filling of document pages, it is necessary to introduce or to put from the exchange buffer text to the basic field of the editing page. For working with the text basic controls are provided (Picture 3).

Picture 3 — Controls for text editing
User options of editing include basic standard functions, such as: style change, change of type, its size, color and way of tracing (fatty, italics and emphasized, upper/subscript), leveling of text (align left, center, align right, and justify), creation of lists and checking orthography. The possibility of inserting of different objects, such as: references, images, videos, tables, variables, HTML-fragments, horizontal lines, topic titles, screenshots, control and index of section, is also provided.
Work with the elements of editing generally is similar to work with the homonymous functions in any text editor, for example Microsoft Word.
Description of User Interface
For creating the description of interface Dr.Explain provides capturing feature of the application screen. This function allows automatic creation in the document of appropriate section, containing the annotated image of the interface of application with the note-lines for each element and a structured description of all existing elements of interface.
To create such a section, click the button "Grab screen" ![]() in the main menu of program, after that "Capture an object " window (Picture 4) opens.
in the main menu of program, after that "Capture an object " window (Picture 4) opens.
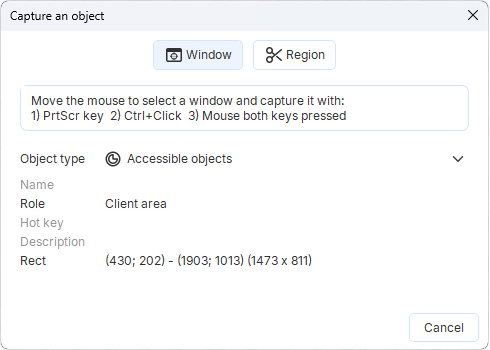
Picture 4 — Capture an object window
Next, choose the application and capture it by pressing the PrtScr (Print Screen) or Ctrl + left-click, or click of right and left mouse buttons.
The captured screen will be automatically analyzed, and an additional field for working with annotated image will appear in the window of program Dr.Explain (Picture 5). A Simultaneously the annotated image and the numbered blocks with images of separate elements for their sequential description also appear in the basic field of editing(Picture 6).
Picture 5 — Area of working with annotated image
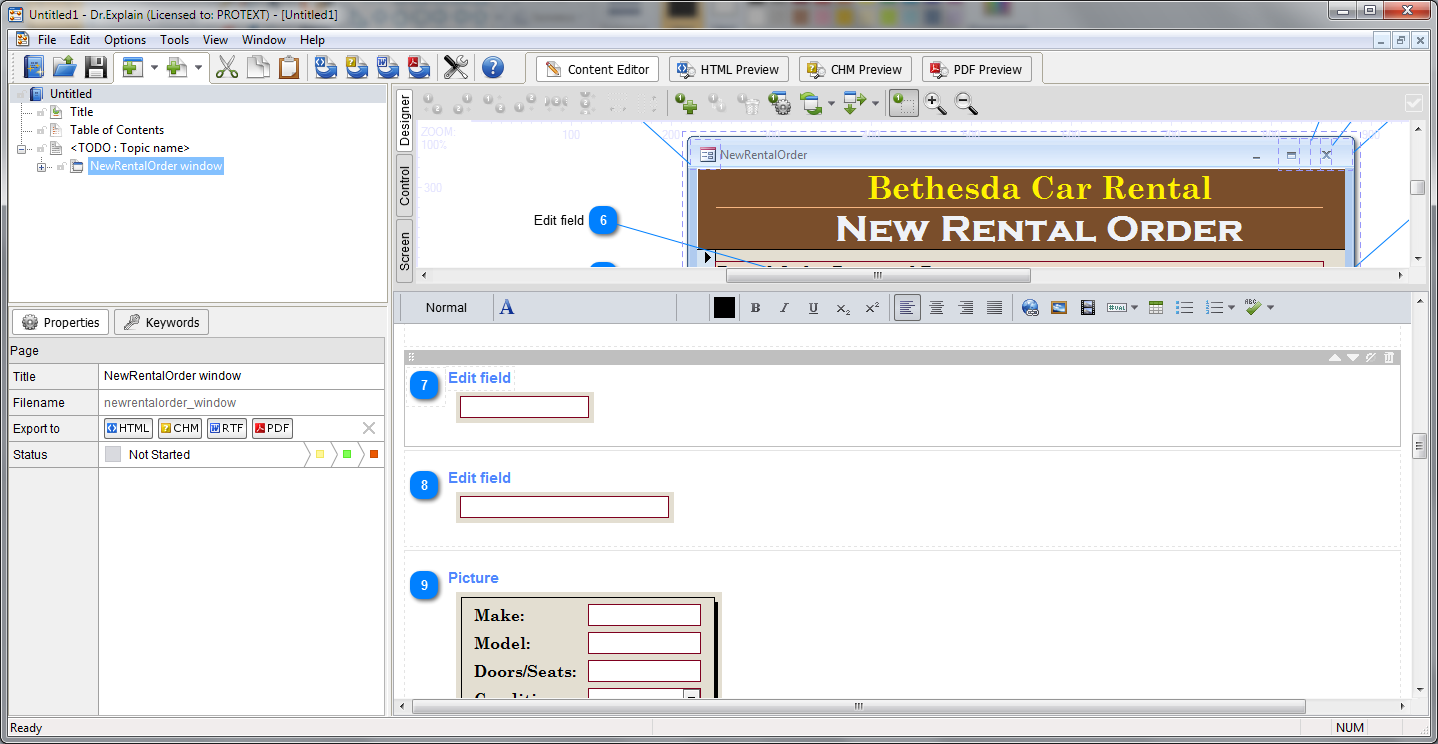
Picture 6 — Basic area of editing after adding of annotated image
For editing of annotated image which are switched by the buttons "Designer", "Control Areas" , and "Screen editor", placed on the left side of the Field of working with image (Picture 5).
"Designer" mode allows adding, removing, and hiding of numbered note-lines with the names of controls, changing the placing of the lines and names, aligning mutual positioning of control names, and customizing the overall style of notes. Also in the "Designer" mode you can modify the dimensions of the image or replace the captured interface image with repeated screen capture, or with image from a file or exchange buffer. All the listed actions are performed by using the buttons placed at the top of the field of working with image (Picture 7).
![]()
Picture 7 — Buttons of editing of annotated image
For adding, hiding and removal of note-lines use the buttons ![]() . In order to change the arrangement of note-line and name corresponding to it, highlight the line by the left button of mouse, then take the element, which should be moved (name with number, or the free end of the note-line) and drag it to the necessary place.
. In order to change the arrangement of note-line and name corresponding to it, highlight the line by the left button of mouse, then take the element, which should be moved (name with number, or the free end of the note-line) and drag it to the necessary place.
To change the control area, which corresponds to a definite note-line first click button ![]() , which will show all the controls, and then select the field you need to change, grab it and drag to the desired location. To resize the field after selecting it, pull the left mouse button over the edge.
, which will show all the controls, and then select the field you need to change, grab it and drag to the desired location. To resize the field after selecting it, pull the left mouse button over the edge.
After you created all necessary note-lines and indicated the corresponding field controls, it is necessary to align the arrangement of names. For this, pushing left button of mouse in the free field, extend the highlight field to the necessary elements. After highlighting of elements use the buttons of leveling and distribution ![]() .
.
The button ![]() opens the annotation designer settings window and designer fields. Here it is possible to customize the style of annotations and shadow of image (Picture 8).
opens the annotation designer settings window and designer fields. Here it is possible to customize the style of annotations and shadow of image (Picture 8).
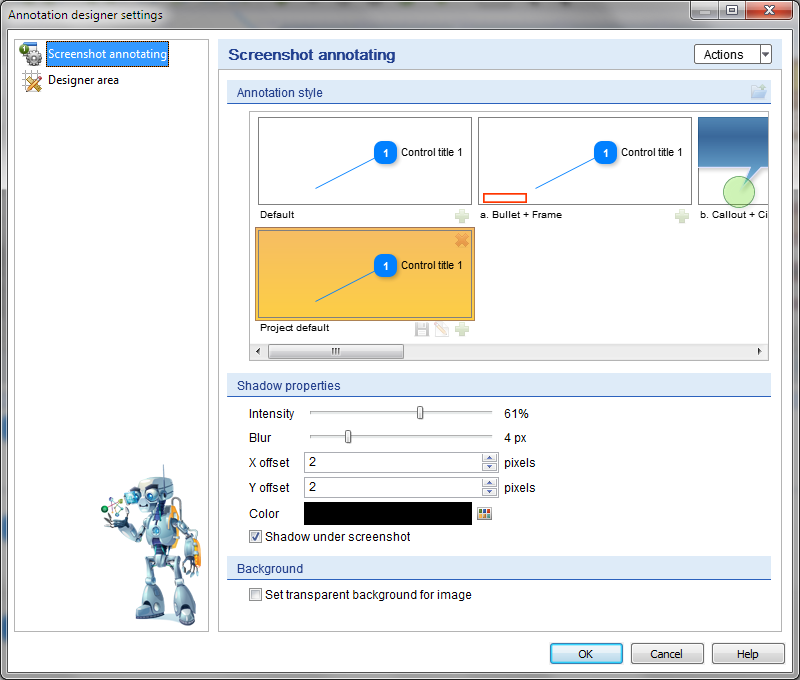
Picture 8 — Annotation designer settings window
Buttons ![]() and
and ![]() allow replacing of image and changing its sizes respectively. Changing the image size is possible after highlighting it in the editor and stretching the angular marker. The point "Reset" in the pop-down menu of the button of size changing allows restoring the initial size of image.
allow replacing of image and changing its sizes respectively. Changing the image size is possible after highlighting it in the editor and stretching the angular marker. The point "Reset" in the pop-down menu of the button of size changing allows restoring the initial size of image.
In the "Control areas" mode a complete list of all existing controls is reflected. By highlighting of a position of list the field corresponding to it is highlighted in the image window, and also in the basic field of editing a text block corresponding to this control is highlighted. In this mode, you can add, remove and hide/show separate controls.
Changing the control area can be done like in "Designer" mode by extending and by moving the chosen field; also it is possible to use the fields of precise values, placed under the image.
The "Screen editor" mode allows adding inscriptions directly to the image. Basic standard functions are accessible for the editing of text.
When setting of annotated image is completely finished, all necessary controls, note-lines and inscription are added, and the arrangement of all elements is corrected, you can start filling text blocks for describing all interface elements. For this, go to the main editing field, select the text block by pressing left mouse button, then the block will be highlighted and you can start filling in the name and description of the control.
While filling the interface element name in the text block, the name of the corresponding note-line and the name of control in the list in the "Control areas" mode automatically changes.
To change the order of the text blocks with a description of the elements, simply drag the necessary block, capturing it with the left mouse button, and then place it to the desired location by pressing the left mouse button. This automatically changes the numbering of all text blocks as well as numbering of all note-lines in "Designer" mode and numbering of all list of controls in the "Control areas" mode.
To move up or down, hide, or delete a text block, you can use the buttons ![]() in the upper right area of the block.
in the upper right area of the block.
Creation of Document by External Files Importing
Dr.Explain allows to create a document or its separate sections by importing content fr om an external file. This feature supports import fr om the following sources: Compiled HTML Help (CHM) files, single file HTML, HLP files, RTF files, Microsoft Word documents, and folders with files HTML, TXT and XML.
Document Structure Editing
For creating of new pages, sections and subsections, and also for editing of the structure of document a field of list on the left upper side of the current project window is used (Picture 9).
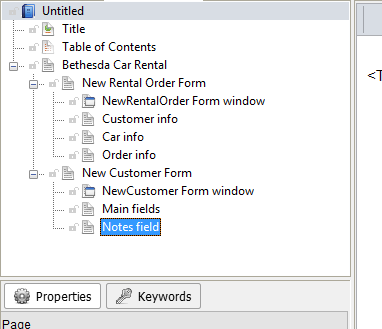
Picture 9 — Project pages list field
To change the order of sections and pages use the items "Above"/"Below" of the shortcut menu that opens when you click the right mouse button on the list. To rename a page, select it by pressing the left mouse button, and then click on its name.
To move a subsection to another section, simply grab the appropriate entry in the list of pages, sections and subsections with the left mouse button and move the cursor to the position of the section, to which you want to move the grabbed subsection.
Button ![]() enables/disables the prohibition of making changes for the selected item in the list.
enables/disables the prohibition of making changes for the selected item in the list.
Structure Features of Microsoft Access Application Help File
Microsoft Access applications are typically add-ons over databases, so presence of several different forms with different interfaces is typical. Each of these forms can contain a large number of different fields to enter information, as well as any controls. Dr.Explain's functionality allows creating a document, the structure of which would maximally correspond to the structure of the described application.
For example, to describe different forms, either the main application interface (if any), you can create root sections. To do this, follow these steps:
- right-click on the project name that is at the top of the list of pages and sections;
- in the opened menu select entry "Add";
- in the inserted menu select entry "Add topic with an annotated screen" (for creating a section with description of the main interface of application);
- in the inserted menu select entry "Add topic" (for creating text sections with description of separate forms).
To describe interfaces of separate forms, their elements or tables and other related with forms data, use the described procedure to create subsection in the respective root sections. If you want to create additional divisions within subsections, you can similarly create inserted topics within sections.
Work with Initial Page and Index Page. Creation of Keywords.
Initial page and Index page are included to the document structure automatically with creation of new project.
Editing the initial page is basically the same as text editing of sections of the document. The main functions available when editing text sections, discussed previously. Initial page feature is that to remove it fr om the structure of the document is impossible, but this page might be hidden, using the entry "Show/hide" of structure editing menu, which can be accessed by clicking the right mouse button on the "Initial page" in the document structure. You can also change the initial page name by using the "Rename" entry of the same menu.
The page "Table of contents" (index page) is filled up automatically in accordance with the structure of document (Picture 10). The editing of table of contents is reduced to changing of title of page and hiding/displaying on the need separate sections, subsections and pages.
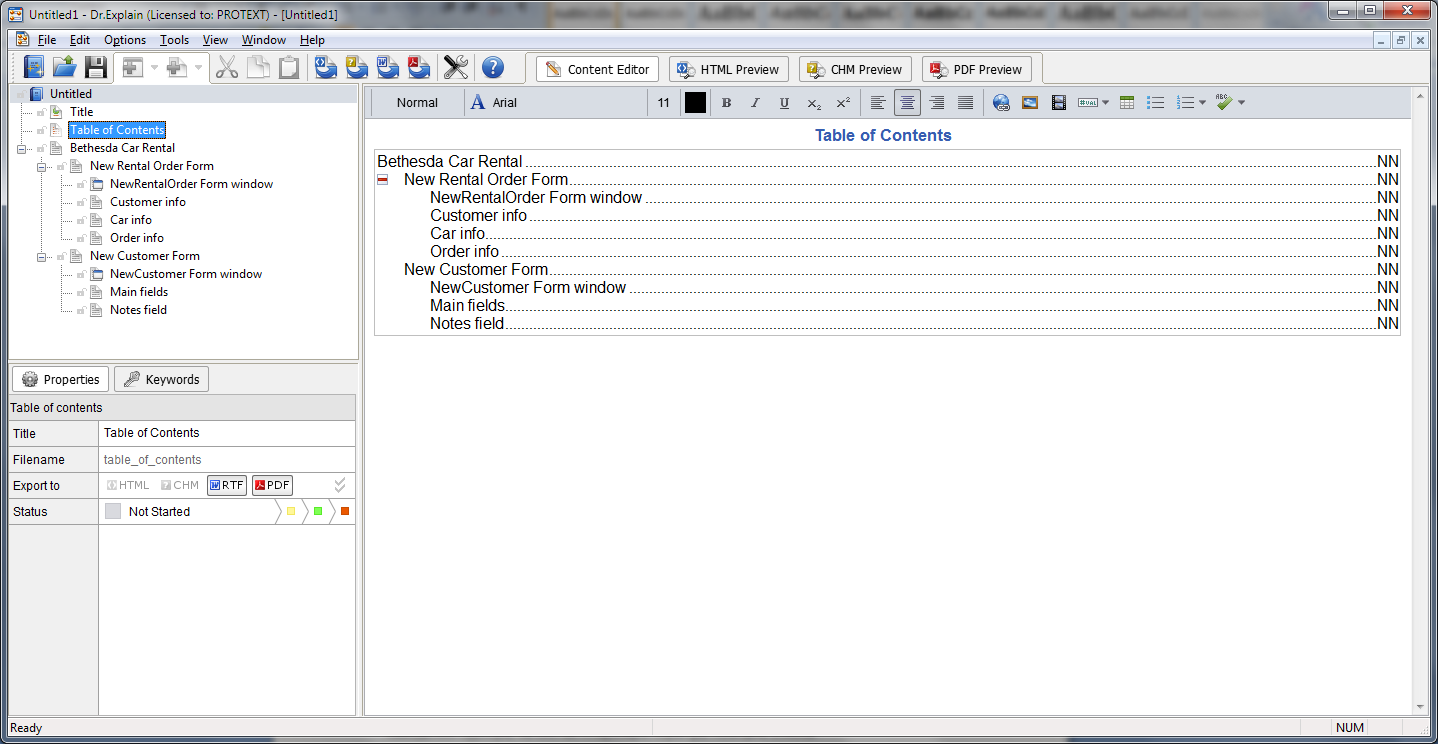
Picture 10 — Index page editing
To hide any page, section or subsection of content press the button ![]() , which appears to the left during mouseover of cursor to the appropriate position. With the hiding of sections and subsections, which have attachments, all inserted pages and subsections also hide. All hidden points are mapped in list by gray color in this case.
, which appears to the left during mouseover of cursor to the appropriate position. With the hiding of sections and subsections, which have attachments, all inserted pages and subsections also hide. All hidden points are mapped in list by gray color in this case.
To display previously hidden points, use the button ![]() , which appears when you mouseover a hidden position of the list.
, which appears when you mouseover a hidden position of the list.
When the work on structure and contents of document is completed, it is possible to create the keywords for all sections, subsections and pages. The keywords allow rapid finding sections interesting for user in the text of document, thus considerably increasing convenience of work with the help file and reducing the time, necessary for searching in the file answers to risen questions.
For creating of keywords use the field of work with keywords (Picture 11), which opens on the left lower side of the current project window after clicking "Keywords" button, placed under the field of list of sections, subsections and pages. The controls proposed allow adding and deleting terms, and also setting of references to corresponding to each term sections and pages of document.
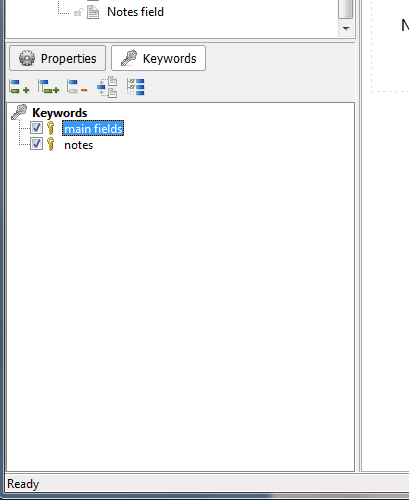
Picture 11 — Area of work with keywords
Document Preview and Export. Project Saving.
Once the document is completed, you have to export it into any format. Dr.Explain allows saving created documents in HTML, CHM, RTF, and PDF. Before you export a document, use the preview function (Picture 12). To do this, use the buttons at the top of the current project window.
Picture 12 — Preview of document in CHM format
The button "Editor" returns the window of the current project to the mode of document editing. Note that the preview function is not available for rich text format (RTF).
In preview mode, make sure all pages and sections of the document appear correctly. If necessary, go into editor mode and make your changes.
To renew the work on the project later, it is recommended to save the project; to do this, use the "Save as" entry fr om "File" menu. After selecting this point a standard file saving dialog box opens, which prompts the user to enter a file name and specify its location.
For exporting to the format needed, use the buttons ![]() in the main controls panel of Dr.Explain window.
in the main controls panel of Dr.Explain window.
For further integration of the created help file into Microsoft Access application, it is recommended to use CHM format. After pressing the button ![]() "Export to CHM" window opens. In this window it is proposed to review the document before exporting and open the exported file at the end of the process.
"Export to CHM" window opens. In this window it is proposed to review the document before exporting and open the exported file at the end of the process.
You can also customize advanced settings by clicking the "More" button, which opens settings of export to format CHM. Please note that the contents of the export settings window is individual for each format. In section "Page structure" button "Setting" is placed, which calls window of HTML template settings and layouts, which allows you to fine-tune parameters of CHM document.
After all required settings have been confirmed, click "Start export" In the window that opens, specify the name and location of the file, and then click "Save".
Integration of Help File into MS Access Application
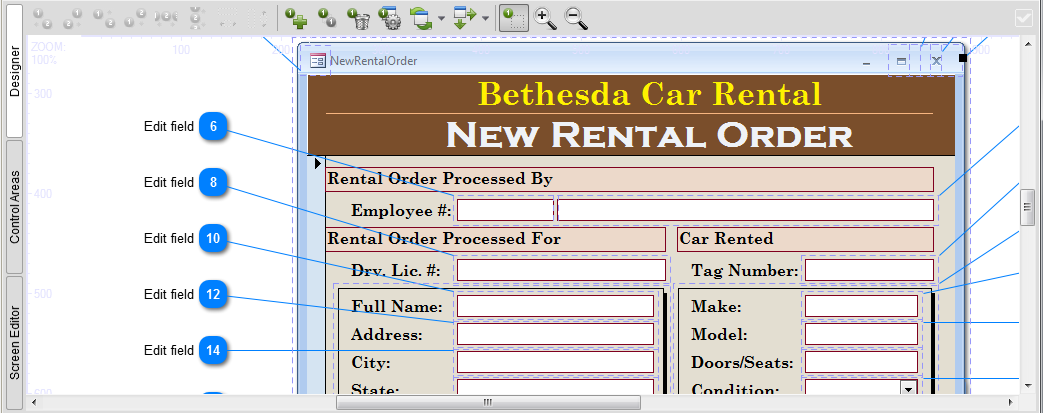
For integration of a created help file into the application it is necessary to create a control in database forms, which will call the help file (Picture 13).
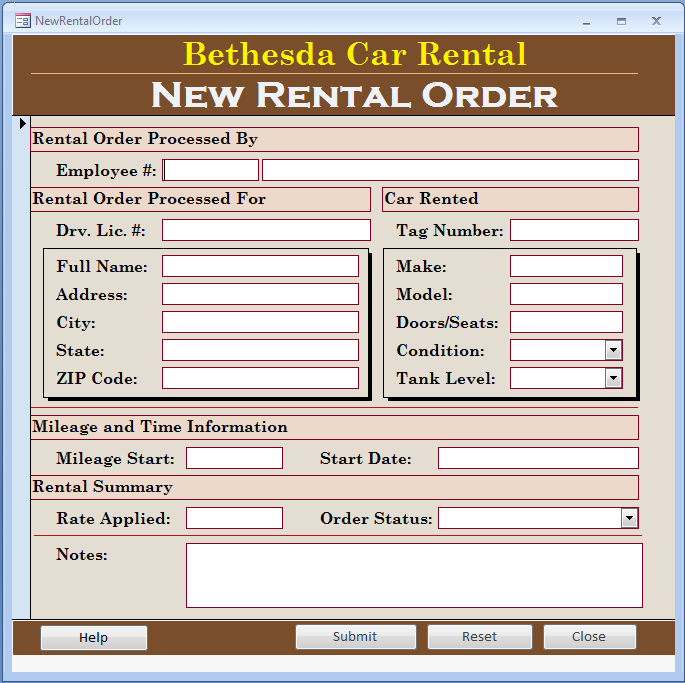
Picture 13 — Form "New rental order" with a "Help" button
To do this, follow these steps:
- open the application in Access;
- Open the form in which you want to create a call to the help file;
- go to design mode by right-clicking on the form and selecting the menu point "Designer"
- select the "Button" element in the opened section "Controls" of the main Quick Access Toolbar of Microsoft Access(toolbar placed at the top of the Microsoft Access window);
- place the element in a free field of the selected form;
- after the arrangement of element, in the panel on the right its properties are shown; if the panel of properties is absent, click the button "Properties page" in the section "Tools" of the Quick Access Toolbar;
- in the window of properties in the section "Others" type the name of element, for example "Help" in the field "Name";
- if needed enter the ToolTip text in the field;
- in the field "Caption" type the capture that you want to appear on the button, for example, "Help";
- then go to the section "Events" and click the button in the field "Button Clicking";
- in the opened window select the entry "Programs" and press "ОК", which opens the code window in Microsoft Visual Basic (Picture 14);
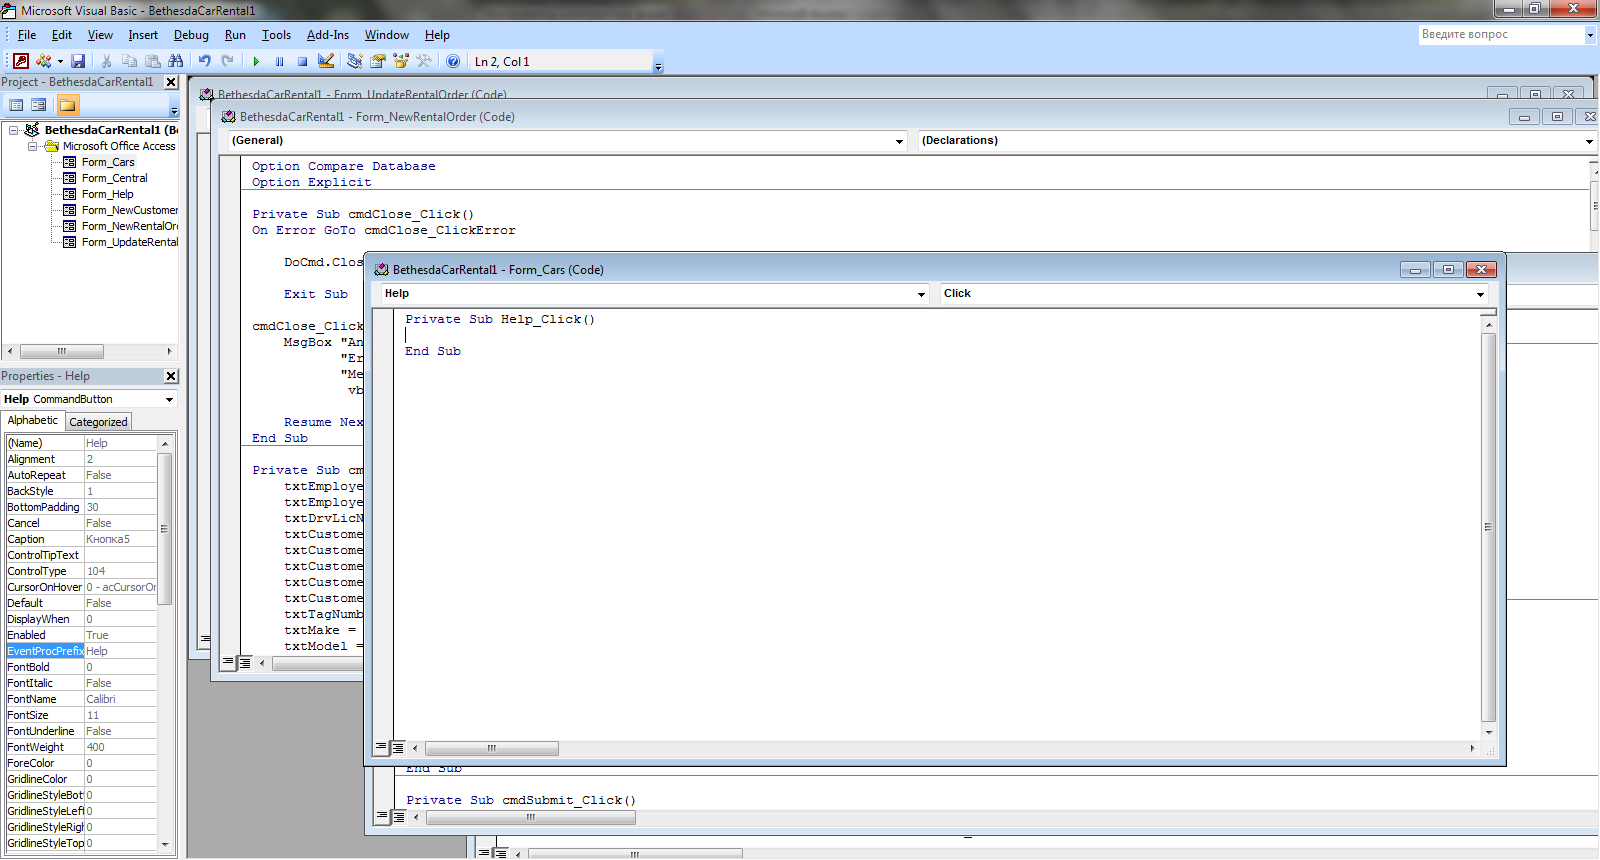
Picture 14 — Element code in Microsoft Visual Basic
- line "Private Sub Help_Click()" shows name of your element (in our case "Help"). Below type the line: Call Shell("explorer.exe " & CurrentProject.Path & "\help.chm", vbNormalFocus), wh ere help.chm – name of help file in CHM format. After that all element code should look like:
Private Sub Help_Click()
Call Shell("explorer.exe " & CurrentProject.Path & "\help.chm", vbNormalFocus)
End Sub
- close Microsoft Visual Basic window;
- save the form;
- check the correct work of the control, opening the form and clicking "Help", after that the help file that you created earlier in the program Dr.Explain should open;
- repeat this procedure for all the forms in which you need to insert the call reference.
NOTE! For correct work of help file call element, the file in CHM format and the database file must place in the same directory. If you need to place a help file separately fr om the database file, use the following line of controls code Shell "cmd /cstart D:\work\techwrite\help.chm", where D:\work\techwrite\help.chm — – full path to the Help file in CHM format. Code as a whole will look like:
Private Sub Help_Click()
Shell "cmd /cstart D:\work\techwrite\help.chm"
End Sub
In this case, at any changing of placement of the help file, the path noted in controls code should be replaced by actual one.
Be careful when entering controls codes, obey the syntax shown in the examples, it is an obligatory condition of proper work of the element calling help file.