×

Annotation designer toolbar

 
Using this toolbar's buttons you can manage screenshots, control references, and customize the appearance of designer workspace.
 
Annotation designer toolbar
 
1

Align

1. Align
 
Use these buttons to align all the selected bullets in one click.
2

Distribute

2. Distribute
 
By using these buttons you can distribute the selected bullets evenly.
3

Same size

3. Same size
 
Use these buttons to set equal sizes for all the selected control areas.
4

Add control

4. Add control
 
Click this button to add a new control reference manually.
5

Hide

5. Hide
 
Click this button to hide controls without removing them from the project.
6

Delete

6. Delete
 
Click this button to remove the selected control references from the project.
7

Annotation designer settings

7. Annotation designer settings
 
Click this button to customize visual style of the screenshot, bullets, and labels. See Annotation templates for more details.
8

Replace screenshot

8. Replace screenshot
 
Use this button to replace the screenshot image. For example, when the window was updated in the new version of your software.
9

Resize screenshot

9. Resize screenshot
 
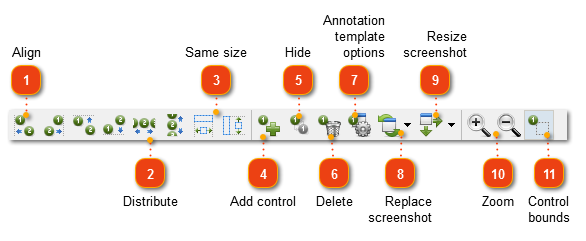
Use this button to resize the screenshot proportionally. You can resize the screenshot in the editor by dragging its corner markers.
 
If the screenshot is large, then instead of reducing the entire annotated screenshot along with the callouts (they will become too small), you can reduce the screenshot size using this button, and leave size of the entire annotated screenshot unchanged in the editor. In this case, the final image will become smaller, but the callouts on it will remain readable.
10

Zoom

10. Zoom
 
Use these buttons to zoom in or out of the image. You can hold down Ctrl and scroll the mouse wheel.
11

Control bounds

11. Control bounds
 
Use this button to show/hide the dashed rectangles displayed around areas of controls (the parts of the original image callouts refer to).
Made by Dr.Explain, software documentation tool