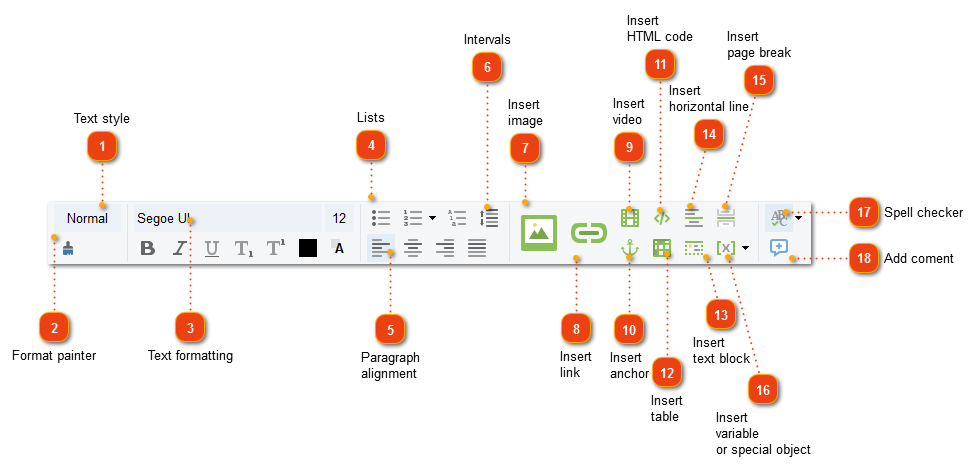
The text editor in Dr.Explain does not differ much from text editors in other word processors. Here you can perform common text authoring operations like inserting tables, images and other objects, etc.
Dr.Explain's embedded text editor supports rich text format with various font faces, including fonts that support the full range of Unicode characters (e.g. Chinese). Dr.Explain also supports RTL (right-to-left) typing mode for languages such as Arabic or Hebrew.
If you need to find a word/phrase/symbol in Dr.Explain you can use the Find-and-Replace functionality that is found in most word processors by using the Ctrl+F or Ctrl+H keyboard shortcuts. You can go to the Edit menu and select Find/Replace menu option there.
Text style
Use this button to apply a pre-configured text style to a part of text in the editor.
Use this button to transfer formatting from one fragment to another. To do this, select the text with the desired formatting, click the button and select the target fragment. You can also use the Ctrl+Alt+Shift+C keyboard shortcut to copy and Ctrl+Alt+Shift+V to paste the formatting.
You can format images, text blocks, etc. — select an object, click and select the target object of the same type.
Example: a topic contains two images — one with an outline and one without. You need to add an outline to the second one:
To do this, you do not need to change the properties of the second image manually. Select the image with the outline, then click the Format painter icon ():
After that, click on the second image to apply formatting. Result:
In addition to text, you can format table cells — select the required cells or the whole table, click the button and select the target table or some cells in it. You can also format pictures, text blocks, etc. — select the object, click the button and select the target object of the same type.
When working with tables, formatting is also performed inside table cells, similarly, when formatting text blocks and controls, the internal content is converted. If you do not want to format the text inside, you can press Undo once after applying the formatting.
In order to apply formatting in several places, double-click the Format painter button. Click it again or press Esc on your keyboard to exit from the pattern formatting mode.
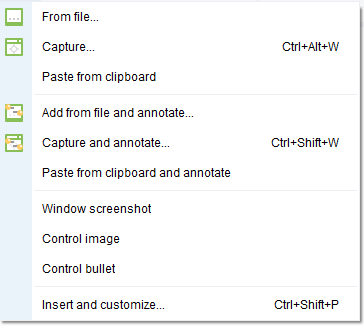
Use these buttons to insert image from file, from clipboard, or a captured one. You can either insert a plain image or create an annotated screenshot object. You can also insert an image of annotated screenshot, control image or control bullet image.